Google Translation:

Showing posts with label DIY Craft. Show all posts

10 DIY Tablecloths


10 DIY Tablecloths to try....

Painted Bunting tablecloth

Hand dip dyed in Teal tablecloth

Dyed tablecloth

Simple tablecloth 

Stamped tablecloth

Perfect confetti tablecloth 

A “Thankful” stenciled tablecloth 

Sweet pom pom’s tablecloth

Easy tea towel tablecloth 

Zebra stripe tablecloth


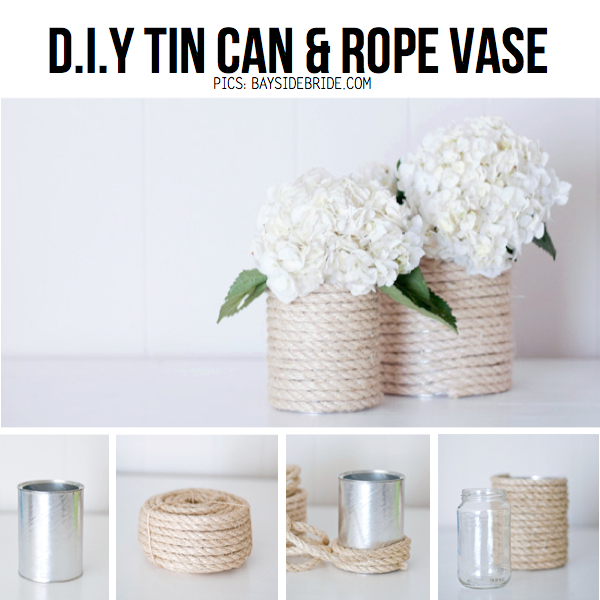
DIY Tin Can & Rope Vase


Pretty DIY Rope Vase from ‘Bay Side Bride’, FULL DIY TUTORIAL HERE!

DIY Ipad Or Tablet Case


If you can't find the right size Ipad or tablet cover that you like, why not make your own! I'll show you how simple and easy it is to do in this tutorial. Happy Crafting!

DIY Make No Sew Clutch


It's great idea for your ipad, laptop, tablet, makeup, and just being fashionable on a budget!

DIY How to Make a Travel Wallet


In this tutorial, I'll show you how to make your own travel wallet — no sewing required!

Materials:
• Foam sheet (1 sheet, 12" x 18")
• Elastic band

Tools:
• Ruler
• Cutting mat
• X-acto blade
• Scissors
• Bone folder 
• Glue gun
• Bottle cap (optional)

DIY Cute Erasers


Try this... you'll like it :-)

DIY Beautiful Crayon Candles


Fall into crafts, & learn how to make a crayon candle! Use your colorful candle for home decor.


DIY Duct Tape iPad/Tablet Case


The project everyone has been clamoring for - a duct tape case to protect your iPad or Tablet. The book-like protector allows you to fully use your device while protecting in a fabulous manner. Children's event planner and entertainer Sophie Maletsky shows you this advanced project in a two part video.

DIY Duct Tape iPad/Tablet Case Video Part 1


DIY Duct Tape iPad/Tablet Case Video Part 2

DIY Upcycled Denim Backpack


Learn how to transform a pair of jeans into a denim backpack! :-)


DIY Lunchbox Container from A Milk Jug


A milk jug can turn into a great lunch box. It is not only food-safe, but it also came with the perfect size to keep your sandwiches from getting squished! You can also used it as a container to organize all your little goodies. And the smaller milk jugs make the perfect on-the-go boxes too... click here...

DIY Golden Rings


A simple craft project to make golden rings. Click here...

DIY Pistachio Ombre Necklace


By adding some paint, pistachio shells turn into such beautiful ornaments for creating jewelry. Find out how... click here..

DIY Ideas & Tutorials for Sneakers


Create your own personalized expression inspired by these awesome DIY Ideas & Tutorials for Sneakers. Click here...

How to Make Colourful Roses


Mix food colouring into separate cups or glasses. Use small narrow glassware if you have them available. There is no guide to how much food colouring to mix in to water. For our purposes, we used about 50ml of food colouring diluted in 500ml of water. You can make the dilution stronger for faster results.

Cut the bottom of the rose stems into however many colours you will be using. For example, if you have three colours, cut the stem into thirds.

Place each cut stem into a different colour. Once all flowers have been placed into the food colouring, secure the roses into a bouquet with ribbon or string so they don't fall over.

Leave the flowers in the food colouring for around 24 hours. This is subjective to your personal likes, so there is no real set time-frame. When flowers look good to you take them out. Keep in mind, the stems have been damaged and flowers will likely begin to wilt within 48 hours.

Once you're happy with the colours, take the roses out of the food colouring. Have a vase with fresh water ready ready on hand. Taking each rose individually, cut the stem diagonally above where the stem has been sliced. You a sharp knife or blade to achieve a clean cut. Do not use a serrated knife, you want a nice clean cut on an angle.

DIY Project : How To Make Your Own Graphic Soap


How-to Dye a plain old pair of jeans into a cool pair of vintage jeans


Turn a plain old pair of jeans into a cool pair of vintage jeans using some quick and easy tricks.

DIY Guidelines for Mosaic Tile Installation


Mosaic tiles use patchwork to make an artistic design. Different shapes and colors are worked together to represent an abstract art. It could be a simple pattern from kids coloring book or a complex design depicting a story. These artistic and creative tiles give you an opportunity to express your interests or feelings in an exclusive manner.

Mosaic tile installation requires great focus and strategy so that the tiles do not crack at long last. These quite simple instructions would be useful in carrying out the job.

- Take a pen marker and draw the layout on the tile surface. Draw a rough sketch and do not focus on detail patterns. These designs would be recognized, once you start the work.

- Segregate the colored and shaped tiles into different piles. Do not forget to get ready a rough pattern on the dry surface. This ensures that the color and shape combinations match with each other.

- The next step is cutting the tiles into the required size. Cut the mosaic tiles using a tile cutter. Keep in mind that you need to keep a gap of 5mm between the tiles to fill the grout.

- After cutting the tiles, paste the tiles on the surface one at a time. Make sure that you paste the tiles with superior glue. Do not put in excess glue as it might take hours to dry out.

- Once you paste the tiles, leave it to bond for 24 hours. Avoid using the area for a whole day. This time is important to build the cohesive force between the mosaic tiles. After 24 hours, transfer the tiles with inadequate amount of glue between the tiles.

- Now, grout the gap between the tiles. Verify with a professional while selecting the grout. You can use an even color or look for colored grout to bring a variation to your mosaic designs.

So, make a magic charm bounding mosaic tile design with help of the above installation methods.

Tips for making soy candles


Soy candles are the new up-and-coming candle for the eco-friendly household and many craft stores have begun to carry supplies for the at-home-chandler. When you are getting ready to make your soy candles, you must consider your candle ingredients and let creativity take over... read more..

How to make an acorn wreath


Acorn wreath is one of the easiest crafts in autumn. It is a craft for adults and children. It is a great way to have fun and preserve the good looks of autumn. It creates warmth welcome at front door, makes an elegant bow to the back of chairs and creates a perfect decoration for any fall get-together occasion especially Thanksgiving... Read More

Do It Yourself???

Do it yourself, often referred to by the acronym "DIY," is a term used by various communities that focus on people creating things for themselves without the aid of paid professionals. Many DIY subcultures explicitly critique consumer culture, which emphasizes that the solution to our needs is to purchase things, and instead encourage people to take technologies into their own hands.
Related Posts with Thumbnails